I’ve been buying a lot of Adafruit Neopixels lately, and particularly a 4 meter long 240 LED strip which sits next to the Christmas tree. The setup is pretty standard, with an Arduino Mega setting up the various light patterns and movement. But now of course, you want to be able to control and program the Arduino from your network. I’ve seen people use the Arduino Yun for this, and it’s probably the easiest and most elegant solution for this.
I don’t have an Arduino Yun unfortunately, but I do have a Raspberry Pi, so I’ll use that instead. We have two options:
- configure a setup similar to the Yun, where we forward the serial port over the network. This requires a separate host computer where we’d run the Aduino IDE, and compile the sketches. The Raspberry Pi would just be a dumb proxy in this case.
- install the Arduino IDE on the Raspberry Pi itself, and have it compile and upload sketches directly. This is the solution we’ll be pursuing in the remainder of this article.
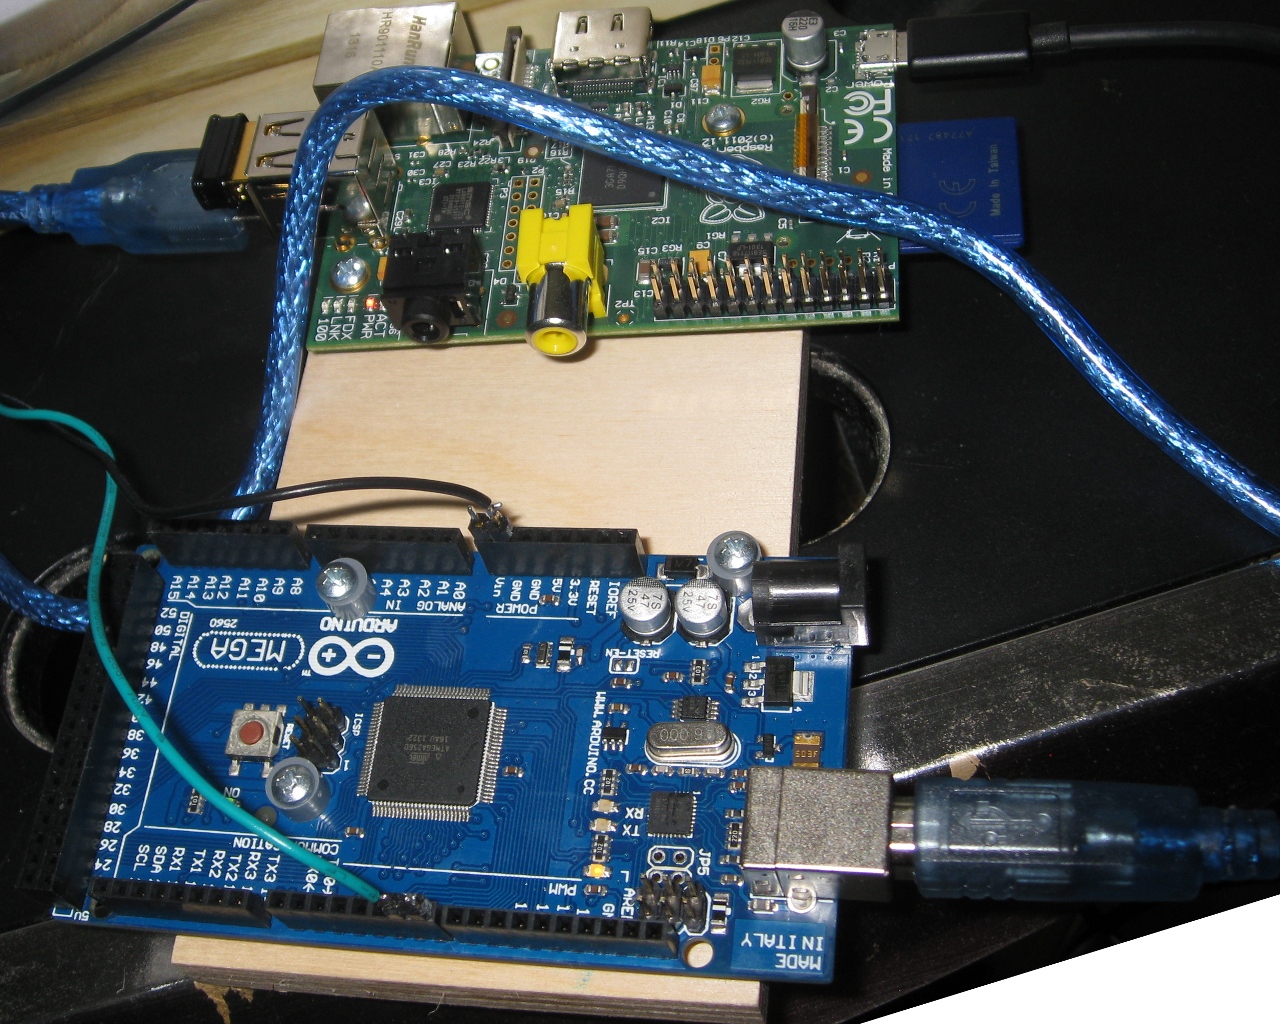
Here is a picture of my setup, I simply connect the Arduino to the Raspberry Pi USB port, just as you would with a regular computer:
Running the full Arduino IDE is unbearably slow when you run it on a Raspberry Pi, and through a remote ssh connection. We are trying to do things remotely after all, and the Raspberry Pi is somewhere close to the LEDs, and not very accessible. A command line solution is much better suited here, and fortunately Ino is just such a tool.
Well, what are we waiting for, let’s install it!
I started off with instructions from here. But ended up modifying them, mostly setting up symlinks instead of copying the files. This way they stay up to date when the OS gets updated in the future. I also found I needed to replace many more files for the Ino installation to work. Here is the precise sequence of commands I used to install and run Ino on my Raspberry Pi:
First install dependencies we’ll need:
sudo apt-get update

sudo apt-get upgrade

sudo apt-get install avr-libc libftdi1 avrdude librxtx-java openjdk-6-jre
Install the Arduino IDE:
mkdir ~/arduino

cd ~/arduino

wget http://arduino.googlecode.com/files/arduino-1.0.5-linux64.tgz

tar xfz arduino-1.0.5-linux64.tgz
The Arduino IDE comes with a bunch of libraries meant for x86/x64 computers, which are useless for the Pi. We need to replace them with Arm versions we already have installed, but are located in various system directories:
cd ~/arduino/arduino-1.0.5/lib/

ln -sf /usr/lib/jni/librxtxSerial.so librxtxSerial.so

ln -sf /usr/share/java/RXTXcomm.jar RXTXcomm.jar
cd ~/arduino/arduino-1.0.5/hardware/tools/

ln -sf /usr/bin/avrdude avrdude

ln -sf /etc/avrdude.conf avrdude.conf
cd ~/arduino/arduino-1.0.5/hardware/tools/avr/bin

ln -sf /usr/lib/avr/bin/ar avr-ar

ln -sf /usr/lib/avr/bin/as avr-as

ln -sf /usr/lib/avr/bin/ld avr-ld

ln -sf /usr/lib/avr/bin/nm avr-nm

ln -sf /usr/lib/avr/bin/objcopy avr-objcopy

ln -sf /usr/lib/avr/bin/objdump avr-objdump

ln -sf /usr/lib/avr/bin/ranlib avr-ranlib

ln -sf /usr/lib/avr/bin/strip avr-strip

ln -sf /usr/bin/avr-cpp avr-cpp

ln -sf /usr/bin/avr-g++ avr-g++

ln -sf /usr/bin/avr-gcc avr-gcc
We don’t need the bin.gcc directory anymore:
rm -rf ~/arduino/arduino-1.0.5/hardware/tools/avr/bin.gcc
We need setuptools so easy_install can work:
cd ~

sudo apt-get install python

wget https://bootstrap.pypa.io/ez_setup.py -O - | sudo python
And finally we can install Ino itself:
mkdir ~/git/amperka

cd ~/git/amperka

git clone git://github.com/amperka/ino.git

sudo easy_install ino

sudo ln -s ~/arduino/arduino-1.0.5 /usr/share/arduino
Once you’re done head on to the inotool Quick start guide to compile your first sketch.


 Posted by Emil Valkov